|
 |
.
|
||
 |
 |
 |
 |
 |
Home Introduction Equipment & Colours Demonstration Shore, Sea & Sky Useful Links The Newfoundland Project
The Old Luggers online- Academy of Marine Painting
PREPARATION - DRAWING - COMPOSITION
All these need attention before we can pick up a brush so we'll try and get them on the same page:
Canvas or Board for Oil or Acrylic - prime with acrylic white primer unless already primed. Boards should be primed on the back as well to prevent warping.
Watercolour papers should be secured to the painting board with a continuous border of wide masking tape - rather than pins - and light papers, below 140lbs especially, should be overall wetted and allowed to stretch dry. The tape allows even movement of the paper.
To make your own low-cost boards for oil and acrylic - cut required size from hardboard, cover with cheese cloth allowing 2 - 3 inch return to the rear of the board. Mix up some hot glue size and paste the cloth to the board, starting from the centre with even outward strokes making sure there are no folds or bubbles and that the weft and warp are horizontal and vertical to give the appearance of canvas. Allow to dry for a day or two and then prime as above. I'll convess to having used good emulsion paint in the early days and it's still holding up 30 years on!
Modern painters don't seem intimidated by white canvas but for traditional or period style work it's better in most cases to stain the canvas with a thin mix of raw sienna and black or burnt umber to age it down. Use plenty of turps and a cotton rag to spread it. Use water and matt gel medium with acrylic. Footnote - there is a style of painting which uses colour glazes over monochrome impasto. Constable in particular felt that his work was enlivened by the odd spot of white!
DRAWING & COMPOSITION
Remember the 3 'P's - Position - Proportion - Perspective.
This isn't necessarily the order of importance but it's probably the order of difficulty for most of us. Pictures will make the points most clearly but very briefly, 'position' is about fixing the focal point of interest in relation to the 'supporting cast' of objects and the total canvas area, 'proportion' concerns the areas and colour dominance of objects relative to eachother and 'perspective' is about making two dimensions appear to be three.
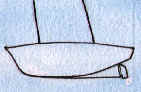
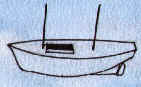
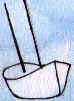
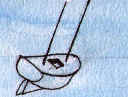
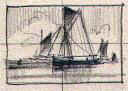
Drawing: As the first step in creating a painting, drawing is about establishing the position and shapes of what will become the different blocks of colour and the crucial points at which things 'happen' eg., a horizon line will be marked, a hull shape will be outlined and set in the sea area, masts will be roughed in at the required positions, heights and rake, points where the shrouds attach to the masts and hull will be noted BUT nothing will be drawn in nut and bolt detail, the drawing is the map of what comes later. The drawing can be done with anything that the paint will later cover, fix or absorb undetectably - charcoal, pencil, paintstick etc. However, in watercolour the drawing can be made part of the picture and would then be in greater detail - but doesn't have to be! Pen and wash is a very effective and punchy medium. Of the various objects that have to be drawn for a marine painting, a ship's hull from various viewpoints is probably the trickiest. These very basic sketches are intended to show a traditional hull in most of the orientations we have to tackle:-
. .
|
|
.
|
||
|
|
|
|
|
 |
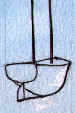
A clinker- built dinghy is a ready made 'wireframe'. To become a hull form expert, try drawing it in each of the 8 views above. |
TIP - Notice how the deck or gunwhale line makes a flattened figure '8' on its side with one quadrant concealed in the three quarter view.
 |
There aren't many straight lines in a marine painting. To 'form' the sails, use the cloth seams and reef-bands etc. to give shape and direction - as with the planks of the dinghy. |
When drawing curves, remember that it's always easier to work inside the arc, using your forearm like the arm of a compass and locking your wrist. If this means turning the work upside down, so what! Straight lines usually look better drawn freehand. If you need to use a straight edge, use the tip of your middle finger to hold the pencil at constant distance from the edge as you draw along it, this way it won't look like a 'ruled' line and will have a natural texture about it. Having said that, I've seen a lot of 'sailor drawn' ship portraits in which all the standing rigging has been drawn with pencil and ruler - accuracy was more important to them than artistic integrity! The bad news is that we shall be using a brush for this fine work - not a pencil.
Composition:
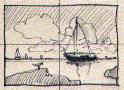 |
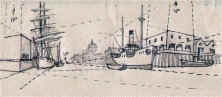
THE FOCAL POINT Look at the position of the boat - main interest - relative to the crosswires. It's near the centre but not on it. The boat does however dominate the lower right rectangle while each of the other rectangles contains something to balance the composition. A moving object looks better moving into the picture - usually! |
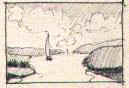 |
DEPTH In our constant effort to turn two dimensions into three we like to create the illusion that we can travel into a painting. See how the estuary banks converge towards the horizon and get fainter. |
 |
TWO
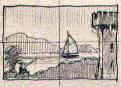
COMPOSITION CLASSICS
Top: The Big 'L' Bottom: The Big Triangle Note again the position of main interest relative to the crosswires. |
 |
How can we fix the position of the horizon in any given picture?
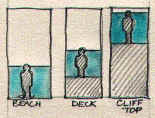 |
The horizon is at the same height as your eyes so, the higher your view 'platform', the higher the horizon. The 'platform' won't necessarily be seen in the picture but the height of the horizon makes it clear whether you're looking across a scene or down on it. |
Having said all that, if you're looking down at your feet then naturally you can't see the horizon - it's disappeared out of the top of the picture. What we're talking about now is a pictorial view of the horizon. If you look at something on the ground about 15 feet in front of you you may just be aware of the horizon at the top of your field of view. If you were drawing this view you would put the horizon in at that height but for construction purposes it works in the same way as when shown at eye height- it is still the line on which lines converge (see below). My picture 'On the Thames at Maidenhead' illustrates the point - although the viewing height is raised somewhat.
With the horizon line established, we can start adding objects to our picture, firstly following the 'rules' of composition and now with regard to proper perspective. What follows are the basics. These will produce convincing drawings which will improve with observation and practice. If you want to get into serious detail try:'Background to Perspective' by William Coombes, first published by Adam & Charles Black.
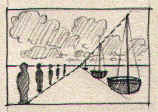 |
LEFT: The horizon is at eye height to a line of people stretching as far as you can see. A line through their feet converges at the 'vanishing point' A line through the tops of taller items, eg. masts, converges with their base line. RIGHT: Things get smaller and fainter with distance. Call it aerial perspective. | 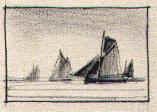 |
 |
In the bottom sketch, most lines converge at the horizon vanishing point. In the case of buildings and other tall items there may also be vertical lines converging at some non visible point above the picture and indeed even some of the horizon 'VP's' will be off to left or right beyond the frame, ie. if you've got two parallel lines in any part of your picture, you must give them a vanishing point. One of the worst and most frequent errors of perspective is water flowing up and down hill or worse still on its side. We won't be doing that!
Return to Top of Page Return to 'Drawing' Return to Composition

©Austin Hill 2000
Home Introduction Equipment & Colours Shore,Sea & Sky Demonstration
Useful Links & Book list The Newfoundland Project
The Old Luggers online Academy of Marine Painting is an ENTIRELY VIRTUAL establishment, a FREE -TO -AIR leisure and recreational site which we hope you'll enjoy and even pick up some useful painting hints. Any of the Old Luggers material can be downloaded and copied for recreational and private but not commercial use. Apart from the many illustrations reached via the links, all the images in Old Luggers are from copyright work by British marine artist Austin Hill. And finally - a LUGGER is a traditional small working boat carrying a loose-footed four sided sail hung from a yard, but you knew that of course !